Check out my Closet for Stampin' Supplies & Retired Stampin' Up! Sets For Sale.
Showing posts with label Big Shot. Show all posts

Monday, August 1, 2011

Happy Birthday MoM


Here are the cards that went into a box set, I made my Mom for her birthday.

I used my Big Shot and Spellbinders I found on clearance.
they are fairly easy to use in the big shot and I loved the different sizes of the dies.
The one downfall is that they are metal so they do move around if you are trying to emboss or make a frame.
I also used my texturz plates and my all-time favorite owl punch and decorative label punch,
I think it coincides with my spellbinders nicely.

Here are a couple more pics up close.


I Just Love this Owl !

This is a gift card holder all the cards are almost 4x4

Here is a Birthday Easel Card


and here are two other cards and the box.


Let me know what you think,

Kymberli

Wednesday, July 20, 2011

SU! Friendly Words


So every time I have seen SU! whisper white paper embossed, 
I think it is so "Regal" so I came up with this card. 
I used SU! Rich Razzleberry card stock & 1/4" grosgrain ribbon.
I used my "BIG SHOT" & a texturz plate to emboss the front of the card.
I really love using SU! wheels and the wheel guide helps me keep everything straight and in order.
I love that you can connect the two pieces so that you can essentially stamp up to a 22 inch border or
snap them together  to make a right angle corner. 
I rolled my sentiment on a 4" x 4 1/4"  piece of whisper white paper then used my SU! Stampin' Sponges to add basic gray ink to give it a distressed look.
These sponges are a great deal because they last forever.
I have had my sponges since, the first time I signed up with SU! in 2005.
You get 3 sponges but you just cut them into little wedges
depending on your preference you can get 6-8 wedges from one sponge.
Then I sewed around all the edges and placed the butterflies on each section and
added a little rhinestone for some "bling".
I made the butterflies with my  SU! Beautiful Wings Embosslits Die.

Let me know what you think...


Kymberli

Wednesday, July 6, 2011

Sew Simple

I hope you all had a FUN & SAFE Holiday and were able to share some downtime with Family & Friends.
We had a nice holiday weekend and Little "J" had a blast in the pool. 
We had Root Beer floats while we watched the firework show Master "D" put on and all in all had a great time.
We are trying to stay cool from the triple digit heat,but honestly it just rained a few weeks ago so we can't really complain about the heat to much. 
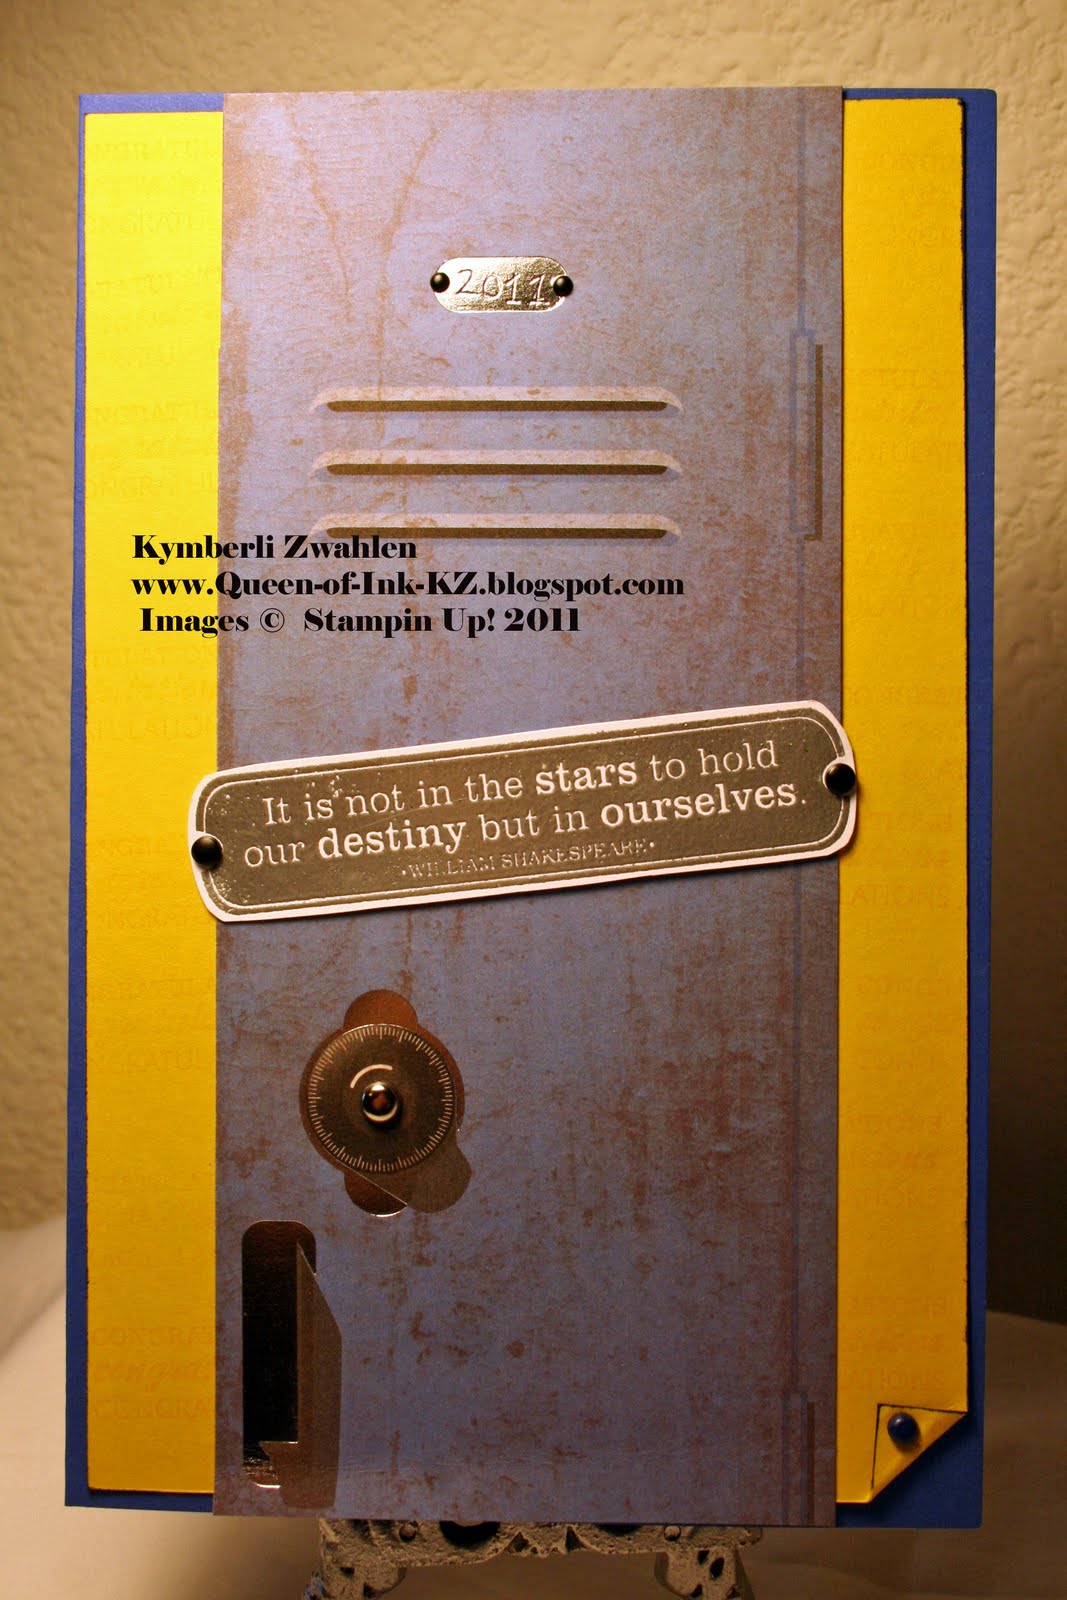
So last week, I tried to organize some of my paper stacks. After I searched high and low for the "perfect" graduation paper and finding it in my very own stash made me realize, I really need to figure out what I have.
So I have decided to try and CREATE with one stack at a time and hopefully my paper stacks will be put to good use and I will have room for more crafting supplies....

So here is my first Project 


All the paper came from my paper stack except for Very Vanilla & Crushed Curry (retired SU! card stock)
I used on the side. I made two cards the fronts are the same and the insides are just a bit different.
I stamped the image three times
once on the Very Vanilla and once on green paper and once on Crushed Curry.
I then cut out their dresses and attached them with snail.


I  added paper buttons with my SU! sizzlits die.

 I really enjoyed sewing the paper together for the inside of these cards,

for the stitching, I used my New Singer "Stitch Sew Quick"
I found it at Wal-mart for around $14.00 dollars and It's so fun to use.
.

Let me know what you think...
Happy Stamping,
Kymberli

Thursday, June 30, 2011

DOstamping Stars Thursday Challenge #55


When I saw the challenge this week, I knew exactly what card, I wanted to make.
I actually made something similar for my son's 10th birthday party invite.
The only real difference was his invite was a bit larger.
So here is what I came up with

Friday, June 24, 2011

Happy Birthday Rafi


This is a card holder,  I made for a dear family friend, I used SU! Basic Black card stock and found the tutorial on SCS here is a link to the Stationary Box Directions
I didn't add the address book,stamp pocket or pen.
Here are a couple more pics of the box.

I made 4 full size cards,
3 3x3 cards and envelope's and 4 tags.


I did emboss the paper with the big shot before making mini envelopes and I stamped a small sentiment on the back of the tags that could be used for any kind of gift.

Let me Know what you think.

Thursday, June 23, 2011

DOstamping Stars Thursday Challenge #54


So for this week's challenge when,I saw these colors all that came to mind was the
Fabulous Florets Stamp Set it is so versatile.
I love that it has a coordinating embossing folder 
for the "Big Shot"and the "DSP" .
I started off with Tangerine Tango as my Base Card and I Stamped on Whisper White alternating the flowers to make my Custom "DSP" so the colors could match this weeks challenge.
I embossed the buckle with the coordinating Flower garden Embossing Folder.
I then stamped two more images of the flowers and used sponge daubers to add some color, I cut them out and used Stampin' Dimensionals to "pop" them out and I think it adds another dimension to the card. 
Every time, I see this set it just makes me smile.
I hope you like my Buckle Card this week.


Materials Used:
SU! Stamp Set: Fabulous Florets
 SU! Paper: Daffodil Delight,Melon Mambo,
Tangerine Tango and Whisper White 
SU! Ribbon:Pumpkin Pie
 
Let me Know what you think
Happy Stamping,
Kymberli

Friday, June 17, 2011

Graduation Cards

Well all the celebrating has come to an end and I wanted to take time and share a few of the things,
I made this year.


This is the card I made for my Brother all SU! items are retired, I used yo-yo yellow and Brilliant Blue paper to match his school colors.The Great Grads Set is available for download. I thought it was a nice masculine card, I loved the locker designer paper, I found in a stack of paper, I had. By just adding a couple of brads it really added to the dimension of the card.

I also made these cards:

I used SU! retired paper Brilliant Blue & Glorious Green along with SU! Retired Great Grad Set ,but it is available for download if you have Stampin Up! "My Digital Studio". I also used Hostess set "Afterthoughts". My Owl punch and Whisper White and Night of Navy Ribbon along with my New Pal the "Big Shot".
They were great to hold checks or money. I cased the card concept from my up-line Dawn Olfchefske.

Here are a couple of pictures of the cute toothpick holders,I made.


These toothpicks seemed easy enough because we only had 35 cupcakes...
That's when I realized,I need the Front & Back to be decorated. and each side had 2-3 punched out images. Oh was I glad that was over...lol
They sure looked great and the guests loved them.


Let me know what you think


Wednesday, June 15, 2011

Happy Birthday Master "D"

Well we survived 12 teenage boys over for the Birthday party and I realized I never posted his invites he designed. He turned 14 and wanted a Shrimp Boil...So here is what he requested.
They were like postcards all the info was on the back I ran the solid sheet's through the Big Shot using one of the texturz plates(114512). I used a retired stamp set for the pot, and I used the designer label punch and four frames stamp set available in the new catalog. 

I also wanted to share the AMAZING Cupcake Cake Miss "A" made for her brother.
The boys loved the alligator "cake" and they were sure "YUMMY"

Thank You :)

These last few weeks have been a whirlwind and with Summer School and College just around the corner,I will try to post as much as I can but Honestly Life Happens and REALLY I cant apologize for spending time with my FAMILY :)...
So to get back in the groove, I wanted to post a Thank You card I made for a Dear Customer.
Hope You Like It
Materials Used:
SU Paper: Whisper White,Rich Razzleberry,Pacific Point & DSP Paisley Petals(Available in the New Catalog)
SU Stamp Set:Engraved Greetings(Available till June 30th Only) 
Accessories: Big Shot,Scallop edge border punch,Snail 
& Stampin Dimensionals
 
I really liked using the DSP, I probably would not have put these colors together without it.
Let me know what you think

Thursday, June 2, 2011

DOstamping StarsThursday Challenge #51

So this week's challenge was a bit difficult because as most of you know that, I took a break from Stampin! Up after having my son and that as I came back, I realized I didn't have as much "NEW" Product as I thought... 
So I decided not to worry about what I didn't have and use what I did have...
Can you believe that I made all the images from My Digital Studio. It came with my kit and I played around with it but put it to the side and let me tell you, even with just the MDS and NO Booster Packs there were so many choices. 
Honestly, I never thought of just printing out what I wanted to stamp. 
It was very user friendly and I am totally impressed with myself and the My Digital Studio Program.

I also tried a new telescoping card idea, 
My Inspiration came from my up-line Dawn Olchefske she is so full of ideas and is so very generous with her Time and Talent. 
Here is a picture of her card, My inspiration


So here is my card for today's challenge 
A.K.A
My Husband's Anniversary Card
Miss "A", Master "D" & Little "J"
I know I cheated but really how was, I going to add in the twenty :)

 Here's a Closer look


I know, I know what does this have to do with the challenge
Wait for it,Wait for it...


Tah-Dah


Materials Used:
SU! Card Stock: Basic Black,Pacific Point & Whisper White
SU! Accessories:Photo Corner Punch "My Favorite,
Round Tab Punch &My Digital Studio "My NEW Favorite"

Just an F.Y.I. if attempting this type of card just remember, the middle section goes on upside down. If your not using a sentiment on the middle section, No worries.

Here are a couple of pics I hope help,


The first and third section are attached facing forward/correctly and the middle section is attached upside down to last layer.
Hope it was worth the wait,
Let me know what you think,
Kymberli

Wednesday, June 1, 2011

Jessica & Keith

 I can't believe I forgot to post this, I guess better late than never...
My daughter needed a card for her Boyfriend's Sister's wedding so 
We came up with this

We used SU! Whisper White for the corset and a cool ribbon technique for the satin ruffle behind the corset. We also heat embossed the "&" sign and the tiny "happily ever after" and used the scalloped edge border punch.
I actually used a lot of Stampin' Up Supplies but they are all retired.
Let me know what you think.

Kymberli
Related Posts Plugin for WordPress, Blogger...